
Homestead Chicken-Omics
Analysis of our first batch of broilers on pasture

At the end of July we butchered our first batch of Cornish Cross broilers. Throughout the entire endeavor I did my best to capture accurate details regarding costs, losses, and lessons learned. In this article I present a deep dive into how it went and share our results.
My first exposure to the idea of raising meat chickens came from Justin Rhode’s Raising Pastured Meat Chickens module at School of Traditional Skills. The module is quick, concise, and to the point; Justin does a good job of demonstrating the practical nuts and bolts of raising broilers on pasture.
After working through that lesson module, I wanted to dig more into the finer details and understand some of the nuances of broilers as a business model, so I spent my daily commute time listening my way through Joel Salatin’s Pastured Poultry Profits which breaks everything down into digestible pieces. I found it super helpful to fill in the gaps left after Justin Rhodes crash course. Joel’s book goes into detail, breaking down the method to the madness, and cumulatively presents a start-to-finish strategy for raising chickens as an integrated component of an intensively managed regenerative livestock grazing operation.
If you read my post about how we got started with eggs earlier this year, you’d know that we have a bit of a problem with impulse control and saying no to some new interesting idea when there is already too much going on. With a major house renovation in progress and one-month-old twin babies we’d be crazy to take on yet another project, right...? But what’s life without a little (or a lot) of chaos!? The success we were having with the laying hens (also somewhat of an impulse decision) had given us a much-needed confidence boost, so one day, mostly on a whim, I put in an order for 50 Cornish Cross chicks and the clock started ticking.
Treating this first time around as a trial run of sorts, I had three main goals going into this endeavor. No matter the outcome I would have considered it successful to meet these three goals, and a nice side effect would be a freezer full of (presumably) high quality chicken.
Learn the process to determine how much effort/time is required - ie. can we actually do this? will we enjoy doing this? are we willing to do it again? etc
Track the financial aspects to determine a price-per-pound for the final whole chickens - ie. can we afford to do this? is it cost-effective? is there profit/market potential? etc
Evaluate the quality of the chicken produced and use this to start our marketing efforts. ie. is the chicken actually better? if so, is it notably better from a consumer’s perspective? is it objective, subjective, or ultimately just a fancy story?
So - enough of the backstory - the trial run is now completed and it’s time to go over some results!
Goal #1 - Learn the Process
Overall, the process was not difficult at all. Each individual step required new learning and had unique challenges, but in summation it boils down to:
Order chicks
Order feed
Build shelter
Pick up chicks and brood for weeks 1 - 3
Service twice per day to top off water, feed, and pine shavings
First two weeks is pretty easy, last week was more difficult as chicks were getting big for the brooder and generating a lot of poop - Next time we need to use a bigger brooder!
Move to pasture
Service pens every morning for weeks 3-8 (roughly 35 days)
Move pen
Refill water & feed
Check for general welfare and tend to any sick/distressed/injured birds
This should not be often, but will happen - weather, predators, accidents etc should be mitigated as best as possible but losses will happen
Process at 8 weeks
This was the most intimidating part of the whole endeavor and probably deserves a dedicated write-up, but the top takeaways:
Implemented a poor-mans (dis)assembly line modeled after the one Justin Rhodes demos in his module
Took a “full” Saturday with three adults that had never done this before
16 chickens in the first 3 hour session, lunch break, 24 chickens in the second 2.5 hour session - this will undoubtedly go faster next time
Absolutely you must have a drum-style chicken plucker if you are doing any more than a few chickens at once - we found ours on ebay for $200 - it’s not the best our there but it was an absolute game changer
Other things that helped with the flow (or could be improved)
We had 2 restraining cones but 4 would have been better
Good quality, sharp knives are also a must
A big stock-pot with a propane canning burner or turkey fryer makes a great make-shift scalding tank once you get the regulator dialed in
A couple (or a few) big coolers with ice
Build yourself a decent drying rack out of PVC pipe - it took all of 10 minutes and really helped with draining/drying/bagging
Chill the chicken for 24-48 hours after processing
This is important! We processed one chicken a few days early due to an injury and ate it for dinner the same day. This wold probably be fine if you were slow-cooking for several hours, but we did a quick pan-frying which resulted in extraordinarily chewy meat. Letting the meat rest for before cooking or freezing allows enzymes to tenderize the muscle fibers
Freeze or cook and eat!


Goal #2 - Financials
The second goal with this trial run was to take a hard look at the financial aspects of producing our own chicken and potentially bringing it to market with future batches. On a personal level, I would be okay producing and consuming chicken at a higher cost-per-pound for the premium of knowing that I grew it myself and know what went into it. As a commercial operation, the target cost-per-pound needs to be low enough to allow for a healthy margin at retail that covers costs and results in a reasonable return for labor. This can be challenging because of limits on what a consumer would be willing to pay for a chicken; even if it IS the world’s most wonderfully raised and best-tasting chicken. In this section, we answer the first half of that question - how much does it cost to raise a pound of wonderful chicken?
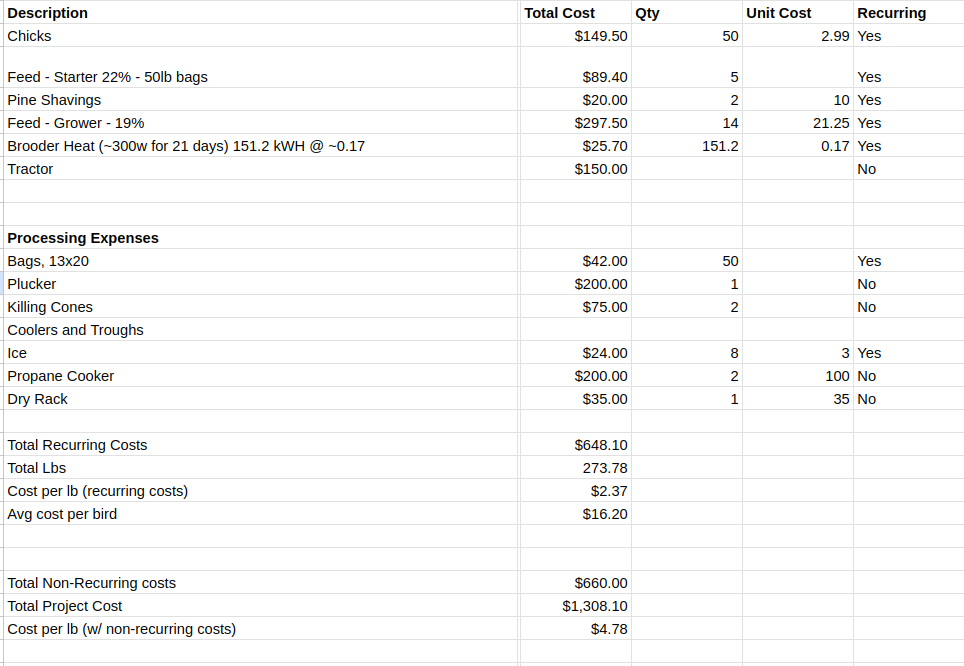
Fortunately, the math isn’t too difficult and there’s not a lot to the puzzle. Rather than revisit every line-item, I’ve opted to include a copy of my actual spreadsheet - this is un-filtered and reasonably captures what it cost us to raise 40 chickens in 2024. There are a few line items that would benefit from additional commentary, and those are highlighted below.
Line-item commentary:
Chicks - we sourced our chicks from a local hatchery and picked them up ourselves the day after hatching. Most hatcheries have free shipping, but picking them up significantly reduces stress on the birds since they are not being sent through the mail. I did not include the cost of fuel or time to drive into town and pick up the chicks.
Starter - we sourced our starter feed from the hatchery and picked up at the same time as the chicks. This was a conventional non-medicated starter feed at $17.40/ /50 lb bag. This was before we had found the mill that provided the non-GMO feed that we switched to at week 3 (see below). We plan to use the non-GMO starter for all future batches, which is ~$22 / 50 lb bag
Grower - We fed a corn-free, soy-free, non-GMO grower feed starting week 3. We bought 20 50 lb bags in bulk and used 14 for the broilers and the rest for the layers. Buying 1000 lbs at a time lowered the price to $21.25 / 50 lb bag. We did not track the cost of fuel or time to pick up the feed directly from the mill.
Tractor/Shelter - we used a Salatin-style tractor that was 8’x8’ (slightly smaller than the “proper” Polyface design that is 10’x12’). We used 8’ 2x4s, 1/2” hardware cloth, PVC roof panels, and some small never-flat wheels from Harbor Freight - I am still undecided between this method and a Justin Rhodes style electric poultry netting with portable “Meat Shaw” for the next batch. Electric fencing will drive the non-recurring costs up a bit, but allows the birds more room to roam and would let them graze directly under the trees in the orchard.
Plucker - This is the #1 best single item that we purchased for this. Most everything else you can make-shift or jerry-rig an alternate solution from what you have on hand. Technically you can build one of these from an old motor and a 55 gallon plastic drum. We watched on ebay for a while and finally caught one on sale for $200. Make sure that you get one that is big enough for chickens - ebay has a ton of “table top” models that are in this price range and it can be confusing - consider yourself warned!
Propane Cooker - We had one of these on hand already and I ordered a small “turkey fryer” that I intend to make extensive use of for canning season and maybe Thanksgiving dinner
Dry Rack - This isn’t absolutely necessary but definitely helpful to have, and ridiculously easy to build. Our rack was made of 1” thin-walled PVC and held 8 chickens at a time. The bulk of the cost is the PVC fittings. Make sure you glue the joints or they will tip when you load this thing up with 60 lbs of chicken (don’t ask me how I know…)
After everything was said and done, chickens were all processed, weighed, packaged, and chilling in the fridge, we tallied everything up to find our recurring and non-recurring costs. Realistically we only need to consider recurring costs, as the non-recurring will amortize out as we do subsequent batches. I’ve included them in the calculations just for the feel-good-zies that even if we never did this again, it wasn’t a total waste of money compared to buying whole chickens from the grocery store.
After crunching the numbers, I can definitively say without any hesitation that for our own personal consumption this knocks the grocery store chicken out of the park just solely on price. The local grocery currently lists their standard conventionally raised (read “factory-farmed”) chicken at $1.99 / lb. and their premium “organic” (also read “factory-farmed”) chicken at $4/lb. Considering that organic labeling is not necessarily a good indicator of quality, we are more than satisfied with a price of $2.73 per pound for a freezer full of chicken that we raised ourselves and know that it ate locally-sourced non-GMO feed, had fresh grass and sunshine every day, and was protected from disease, pests, and predators through active management. That seems like a pretty darn good value proposition to me!
From a commercial perspective, we need to go a step further and consider our time, labor, overhead, etc. and also the fact that farmers shouldn’t (and can’t) work for free. The bulk of the labor for a small batch of chickens takes roughly 10 minutes per day when things are going well. When things are not going well (weather, predators, mechanical issues, etc) it can easily take 30-60 minutes to repair a broken watering system or tend to a sick or injured bird. For our purposes, I’d estimate that ~90% of the days were “normal” days, and 10% of the days were “not normal” days. So, over the span of 8 weeks, I’d estimate that we spent:
51 “normal” days * 10 minutes per day = 8.5 hours
5 “not normal” days * 60 minutes per day = 5 hours
1 “processing” day = 3 hours (morning) + 2.5 hours (afternoon) + 3 hours (setup, cleanup, 1.5 hours each) = 8.5 hours
Total “Hands On” Time: 22 hours
Avg. Time per Chicken (40 chickens): 0.55 hours per chicken
This is where we get a bit stuck in our analysis - trying to nail down a number that is both a reasonable price that will be competitive in the marketplace and also provide the necessary margin to justify the time / labor investment. I certainly don’t have any desire to do this type of work for minimum wage, but also don’t need to be pulling down $100 per hour. This is a challenge for us because, as discussed below, our chicken is superior to grocery store chicken in every way imaginable (but we don’t - and probably won’t - pay for the “organic” labeling), and that certainly has value - but how much of a premium is a customer willing to pay?
Our primary strategy at this point is one of education - both for ourselves (truly understanding what makes our chickens better) and to help consumers within our community understand what we are doing and why it’s better than conventionally raised chicken (and therefore should be expected to carry a higher price tag).
#3 - Quality
As I’ve discussed above, we are still “evaluating” the quality of our first batch of broilers. For our own personal consumption, we couldn’t be happier - the chicken is absolutely delicious, the meat is tender and juicy, but not at all watery. It doesn’t shrink when you cook it, and there isn’t any fecal soup on our homestead that could have sneaked it’s way into the meat. These are all relatively subjective claims of perceived quality, and as a data-person, I like objective claims a lot more. If I had the resources I’d send our chicken off to the lab to have it tested for nutrition content and compare that to a sample set from the local grocery store. But, since I don’t have the time nor the funds to do that, these are the things that I’d consider that we’ve done “better” than the typical factory-farmed chicken, and some discussion on what we could potentially improve in future batches:
Non-GMO Feed - We used locally sourced non-GMO feed that is corn and soy free. This does seem like an improvement over using conventional feed, but organic feed could be better as a way to guarantee no pesticides were used.
Living Arrangements - Our chickens got fresh ground every day. At a minimum this gets them away from parasites, pests, and litter from the previous day. As discussed in more detail below, due to our timing this year, the grass wasn’t necessarily always greener after the move and we are hoping to improve this in the future.
Fresh Air and Sunshine - The life of a broiler chicken is short no matter which way you slice it. Unlike most chickens produced in the USA today, our chickens were given the opportunity to be chickens by living out the instinct to forage for grass, bugs, seeds, and worms while out on pasture. Joel Salatin talks frequently about our duty as farmers to to honor the “chicken-ness” of the chicken and the “pig-ness” of the pig. I feel that we did this successfully with our first batch, but will continue looking for opportunities to improve. Next time around I’d like to experiment with the electrified poultry netting approach that provides even more space for the chickens to run around and do chicken things.


Challenges
Lest the reader think that this is all fun and games, we also had our fair share of challenges during our trial run.
Limited Brooder Space
In his module, Justin Rhodes recommends a minimum of one square foot of space for every four chicks up to three weeks of age. Our brooder measures 6.5’ by 2’ for a total of 13 square feet (hypothetically enough for 52 chicks at three weeks). Going into this I was aware that we would be pushing it on the small side, but I sorely underestimated how crammed it would get. Cornish Cross are eating machines, which means that they are also pooping machines. The rate at which these guys can demolish a fresh layer of pine shavings was astonishing, and by week 2.5 I was needing to refresh the bedding at least three times a day. Next time around I plan to reduce the ratio to at most three chicks per square foot, but preferably only two per square foot, and will provision for a deeper bedding layer (6-8 inches) from the start.
Losses on Pasture
The astute reader will notice that we ordered 50 chicks but only processed 40 chickens at 8 weeks - 20% loss is higher than what would be considered “normal” and is frankly unacceptable in the long term. We tracked each of our losses during this process, identified the cause, and implemented corrective actions in an attempt to prevent any more losses from the same cause. Our biggest loss was during week 5 we had a sustained heat wave with high temps over 105 for almost 8 days straight and lost 6 of our biggest birds in one day about 4 days into the heat wave. We implemented a shade-cloth system and fully-automated watering and did not have any more heat related losses for the remainder of the week.
Seasonal Limitations - Brown Grass vs Green Grass
We got a late start on brooding our chicks and the last really good rains for the summer happened right before we moved the chicks out to pasture. It was nice to not have to worry about keeping the chicks warm and dry, but the grass in our pasture started browning very quickly after the spring rains dried up. By the time we reached the final week on pasture, the bulk of the fresh grass each day was already dormant, so the chickens weren’t getting a very robust salad bar each day. Our pasture is actually a 10 year-old fruit orchard that was previously a commercial timber stand. The soil has not had much (if any) livestock activity for at least the last 50 years. The limited organic matter in the soil reduces the overall water-holding capacity. Our hope is that as we implement more regenerative practices in our pasture, we’ll start to see higher water retention and grass that stays greener later into the season.
Summary
Overall, this trial run has been a smashing success for us. There is likely some element of beginner’s luck, but we’ll take what we can get! At this point in the season we are shifting our attention to preparing the fall garden and getting the giant greenhouse set up for growing some cool-season crops for the first time ever. We plan to start our next batch of chickens in the spring time, and now that we know the process we’ll be ramping up the number of batches that we’ll run to fill up our own freezer and will be on the lookout for folks that are interested in getting in on some of the best chicken around!
If you found this article helpful or informative, please consider subscribing!
I also appreciate the breakdown, Kyson, as it makes the cost more relatable when you can see where it is going. And though I have followed Andrew through his poultry journey, a specified layout of the process is appreciated. May all your years be productive and enjoyable.
Great article Kyson! Everything you described was pretty much word for word what we experienced growing our birds out for the past couple of years. The heat waves south of you were no better, we used sprinklers with our tractors but still lost some even with all that.
We saved around $80 by making our own kill cones from flashing and furring strips at less than $10 per cone. Store bought ones are straight robbery!
I like all the math and the breakdown. You'll get your pasture where it needs to be with all that nitrogen, and I believe CC only use 5% of pasture as forage. Thank you for the post man, and congratulations on your healthy and delicious food!